Small Engine Carburetor Problems: Cleaning & Repair 2025
Your small engine carburetor is giving you grief again. The mower that fired up perfectly fine last spring? Now it won’t start, or it runs like garbage when it does. Yeah, I know the feeling. After 15 years of fixing these things, I can tell you that carburetor problems are probably the most common issue I deal with. But here’s the good part: most of the time, you can fix it yourself without spending a fortune at the repair shop.
Table of Contents
▼- Understanding Small Engine Carburetor Problems: Common Symptoms
- How to Clean a Small Engine Carburetor: Step-by-Step Guide
- Small Engine Carb Repair: Troubleshooting & Fixing Common Issues
- How to Adjust a Small Engine Carburetor: Tuning for Peak Performance
- Small Engine Carburetor Parts: What You Need to Know
- Honda Small Engine Carburetor: Brand-Specific Tips & Solutions
- Carburetor vs Fuel Injection: Understanding Small Engine Fuel Systems
- When to Repair vs Replace Your Small Engine Carburetor
- Final Thoughts
Look, carburetors aren’t mysterious black boxes. They’re actually pretty simple mechanical devices that mix air and fuel. When they stop working right, it’s usually because something’s dirty or stuck. I’d say 8 out of 10 carburetor problems I see could’ve been avoided with basic maintenance, and most can be fixed in your garage with tools you probably already own.
I’m going to show you exactly how to diagnose what’s wrong, clean it properly, make repairs when cleaning isn’t enough, and adjust everything so your equipment runs like new. Whether you’ve got a Honda, Briggs and Stratton, or whatever else, the basics are pretty much the same.
Understanding Small Engine Carburetor Problems: Common Symptoms
First thing: let’s figure out if your carburetor is actually the problem. Can’t tell you how many times someone’s hauled their mower to me, totally convinced they need a new small motor carburetor, and it turns out to be a bad spark plug or clogged fuel line. So let’s not jump to conclusions just yet.
Hard Starting or Won’t Start at All
This is the big one. You’re out there yanking that pull cord 20 times, breaking a sweat, and nothing happens. Or maybe it fires for a second and dies. When a small engine carb isn’t delivering the right fuel mixture, starting becomes a nightmare. I see this constantly after equipment’s been sitting in the garage all winter. Old gas turns to varnish, clogs everything up, and boom – you’re stuck. This is one of the most common lawn mower starting problems I see every spring.
Runs Like Crap
Okay, so it starts. But the engine’s surging up and down, going waaaah-waaaah-waaaah like it can’t decide what speed it wants. That’s usually a partially plugged jet. The engine’s literally gasping for fuel. Trust me, trying to mow your lawn when the mower keeps threatening to die every 10 seconds will drive you nuts.
Blowing Black Smoke
If you’re seeing dark exhaust, you’re running too rich. Too much fuel, not enough air. This wastes gas, makes your mower run poorly, and over time can actually damage the engine. The spark plug gets fouled, carbon builds up everywhere – it’s a mess.
No Power
The engine starts fine, idles okay, but when you try to actually cut grass? Forget it. It bogs down, sounds terrible, and maybe even stalls when you engage the blades. A gunked-up small carburetor can’t deliver enough fuel when the engine’s working hard. I had this happen to my own mower a few years back. Things ran perfectly sitting still, but try to mow, and it was pathetic.
Leaking Gas
See fuel dripping from your carburetor or air filter area? That’s your float needle not sealing. Don’t mess around with this one – it’s dangerous and you’re literally pouring money on the ground. Usually means the float’s stuck or the needle valve’s shot.
Starts Then Dies
This one’s frustrating. Engine fires right up, you think everything’s great, you let go of the choke and… dead. A classic sign that the carburetor’s not getting fuel through properly. Main passages are clear enough for starting with the choke on (lots of fuel), but too clogged for normal running.
Now, before you tear into the carburetor, check the obvious stuff. Got fresh gas in the tank? Fuel line looks okay? Is the air filter completely packed with dirt? I’ve watched people spend hours cleaning a small engine carburetor when all they needed was a new air filter. Don’t be that guy.
How to Clean a Small Engine Carburetor: Step-by-Step Guide
Alright, so you’ve decided the carburetor needs cleaning. Good call. In my experience, a thorough cleaning fixes about 70% of small engine carburetor problems. It’s not complicated, but you’ve got to be patient and detail-oriented. Rush through it and you’ll just be doing it again next weekend.
What You Need
Grab these before you start: screwdrivers (flat and Phillips), socket set or wrenches, carburetor cleaner spray (get the good stuff), wire brush, safety glasses, gloves (the nitrile kind work great), and some small containers to keep screws organized. That last one’s important. You don’t want to be hunting for tiny screws on your garage floor at 9 PM.
Oh, and work somewhere with decent lighting. I can’t stress this enough. Half the problems people have with reassembly come from not being able to see what they’re doing.
Getting Started – Safety Stuff
Disconnect that spark plug wire first. I learned this lesson when I was younger and stupider – had an engine fire unexpectedly while I was working on it. Scared the hell out of me. Let the engine cool completely if you’ve been running it.
Shut off the fuel valve if you’ve got one. No valve? You’ll need to drain the tank or clamp off the fuel line. Work outside or in a well-ventilated garage. Gasoline fumes are heavier than air, and they’ll pool in low spots. One spark and you’ve got real problems.
Getting to the Carburetor
Take off the air filter cover and pull out the air filter. On most mowers, the small engine carburetor bolts right to the engine with 2-3 bolts. You’ll have throttle linkage and maybe a choke cable to disconnect. Here’s a pro tip: use your phone to take pictures as you go. When you’re staring at a pile of parts later, wondering where that spring goes, you’ll thank me.
Removing It
Loosen those mounting bolts and pull the carburetor away from the engine. There’s a gasket in there – try not to rip it up, but replace it anyway if it’s old. Disconnect the fuel line and have a rag ready because gas is going to drip out.
Taking It Apart
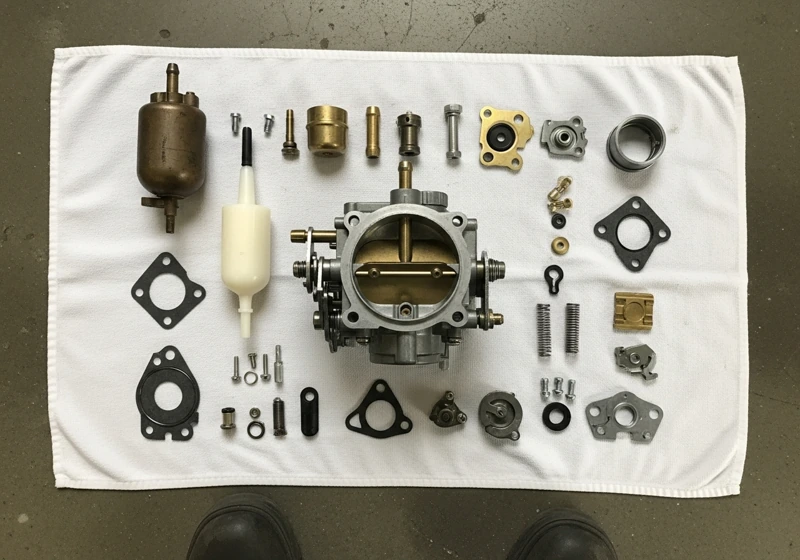
Flip the carburetor over. See that bowl on the bottom? That’s the float bowl. There’s usually one bolt in the center holding it on. Remove that bolt carefully – there’s often a gasket or O-ring you don’t want to lose.
Inside you’ll find the float (looks like a little pontoon), the float needle (pointy brass thing), and the main jet (brass fitting with a tiny hole). Take a good look at how everything sits before you start pulling parts out. Seriously, look at it. The float’s probably held in with a pin that slides out – be gentle with it.
The Cleaning Part
This is where people either do it right or waste their time. Every single passage, every hole, every port needs to be clean. I mean spotless.
Spray carburetor cleaner through everything. You’ll see tiny jets – those need to flow freely. I use a thin piece of wire (like from a twist-tie) to gently poke through the jets. Don’t force it and don’t make the holes bigger.
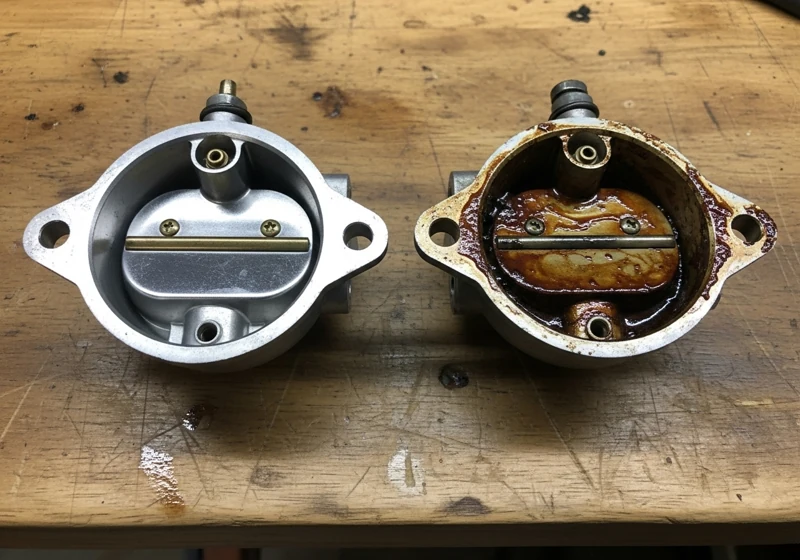
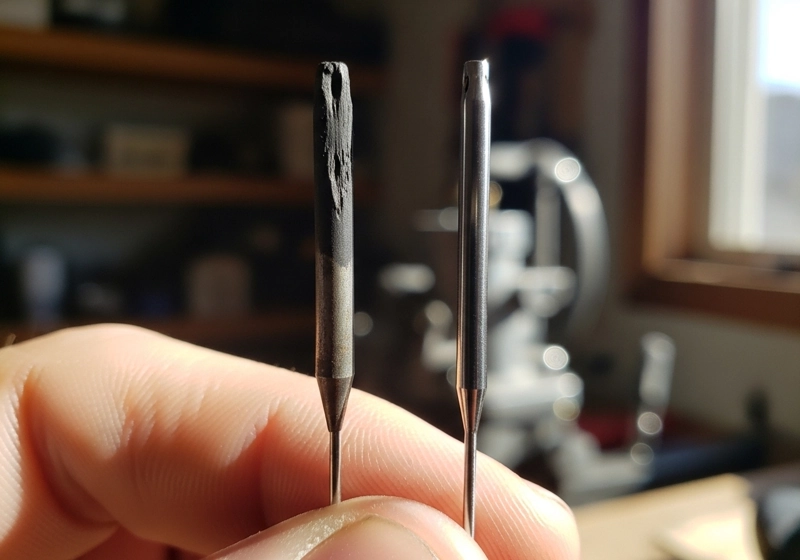
The float bowl usually has this brown crusty stuff that looks like shellac. That’s old gas that’s turned to varnish. Scrub it off with the wire brush until it’s shiny. Check the float needle valve – the tip should be soft rubber, not hard and cracked.
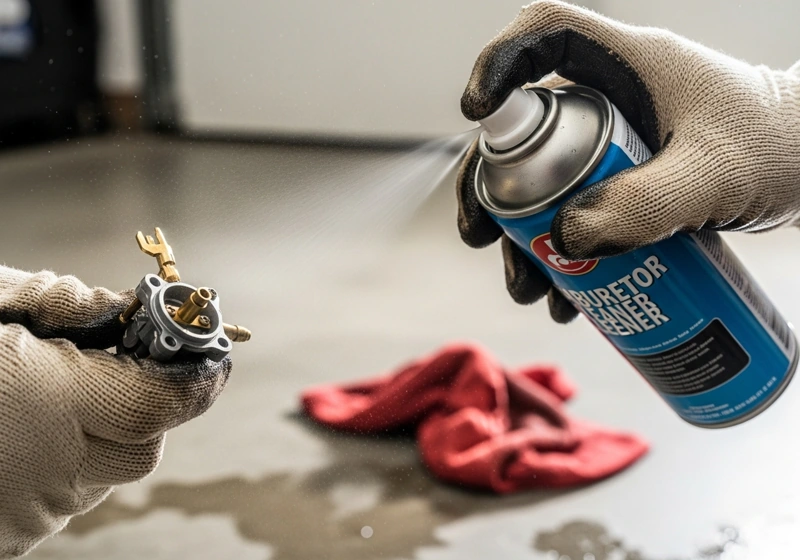
Blow through all the passages with compressed air if you’ve got it. If you don’t, just make sure the cleaner’s flowing through freely.
Check for Damage
While it’s apart, look for cracks in the casting, warped surfaces where gaskets seal, and stripped screw holes. Check that the float moves freely. It shouldn’t have gas inside it – if it does, it’s done for. Look at the throttle and choke plates. They should close all the way and not be bent.
Putting It Back Together
This is where those pictures come in handy. Reassemble everything in reverse order. Replace that gasket between the carburetor and engine – don’t reuse the old one even if it looks okay.
When you bolt it back to the engine, don’t overtighten. You’re threading bolts into aluminum, and it’s really easy to strip. Snug is good enough.
Hook up all the linkages and cables. Move the throttle and choke controls – they should work smoothly without binding.
Small Engine Carb Repair: Troubleshooting & Fixing Common Issues
Sometimes cleaning a small engine carburetor doesn’t cut it. You’ve got actual broken or worn parts that need replacing. Let me walk you through the problems I see most often and how to actually fix them.
When It’s Flooding
Gas pouring out of your carburetor means the float valve’s not doing its job. Either the float’s stuck, the needle’s bad, or the seat where the needle sits is damaged.
Pull the float bowl off and check the float needle. Does it have a nice rubber tip? Or is it hard, grooved, or just nasty looking? Replace it. They’re cheap – like 8 bucks maybe.
Here’s a quick test I use: shake the carburetor gently with the float bowl off. You should hear the needle clicking around. Blow through the fuel inlet – when the float’s up, air shouldn’t pass through. If it does, you need a new needle or seat.
Stuck Jets
If you can’t clear a jet with cleaner and careful probing, don’t force it. You’ll just make it worse. Jets are precision-sized. Making the hole bigger messes up your fuel mixture. Replace the jet or get a rebuild kit.
Bad Gaskets
Old small engine carburetor gaskets get hard, shrink, and crack – basically, they stop sealing. This causes air leaks, which throws off your fuel mixture big time. Always replace gaskets when you’re in there. They cost next to nothing, and fresh gaskets can make all the difference.
Want to know if you’ve got an air leak? If your mower runs better with the choke partially on, that’s a clue. Another test: with the engine running, spray carb cleaner around the gasket areas. If the idle speed changes, you have found your leak.
Torn Diaphragms
Some engines use diaphragm-style carburetors instead of the float type. They’ve got a rubber diaphragm that pumps fuel. These can tear or get stiff. A rebuild kit includes a new one. When you put it in, make sure it lies flat without any wrinkles, or it won’t work right.
Corrosion and Stripped Threads
Ethanol gas eats carburetors alive. It corrodes aluminum and brass like crazy. If your carburetor looks really corroded or has stripped screw holes, honestly, just replace it. You’ll spend more time and money trying to fix it than buying a new one.
I had a customer bring in a carburetor that looked like it’d been sitting in a bucket of acid. Yeah, no. Some things aren’t worth saving.
How to Adjust a Small Engine Carburetor: Tuning for Peak Performance
Once everything’s clean or repaired, you need to adjust it properly. Adjusting a small engine carburetor isn’t hard, but it takes some patience. Most homeowners can handle this fine.
What You’re Actually Adjusting
Modern small engines usually have one or two screws you can adjust. The EPA has made manufacturers seal or eliminate a lot of adjustment options, but here’s what you might find:
Idle Speed Screw: This is usually bigger and easier to spot. It physically touches the throttle linkage and controls how fast your engine idles.
Mixture Screws: These control the air-fuel ratio. You might have a high-speed screw, a low-speed screw, or both. Lots of newer engines have these sealed off, so you can’t adjust them.
How to Actually Do It
Get the engine warm first. Let it run for five minutes. Check your manual for the right idle speed – usually somewhere between 1,750 and 2,200 RPM for lawn mower engines. Different types of lawn mower engines have slightly different RPM specifications.
For adjusting small engine carburetor mixture screws, start by gently screwing them in clockwise until they just barely seat. Don’t crank on them – you’ll damage the soft brass seat. Now turn them back out (counterclockwise) about 1.5 turns. That’s your starting point.
Fire up the engine and adjust the idle speed screw until it’s running at the right RPM. If it’s running rough, mess with the low-speed mixture screw. Turn it a quarter turn at a time. If the engine smooths out, keep going that direction until it starts running rough again, then back off a hair. If it gets worse, go the other way.
Fine-Tuning the Thing
A properly adjusted small motor carburetor should accelerate smoothly when you whack the throttle open. If it hesitates or dies, it’s too lean – needs more fuel. Richen it up a bit.
At full throttle under load (like mowing thick grass), the engine should hold steady RPM without surging or smoking like a chimney. Surging means too lean. Black smoke means too rich.
My advice: make tiny changes and test between each one. If you start turning screws back and forth randomly, you’ll just confuse yourself and waste time.
When You Can’t Adjust Anything
A lot of modern engines have fixed jets and no adjustment screws at all. If your carburetor’s clean and you’re still having problems, the jets might be wrong, or there’s a vacuum leak somewhere else.
Small Engine Carburetor Parts: What You Need to Know
Understanding what’s actually inside your small engine carburetor helps you figure out what’s wrong and order the right parts. Let me break down what all these pieces do.
The Main Players
Float and Float Needle: These work like a toilet tank. Fuel comes in, bowl fills up, float rises, needle closes, fuel stops. Pretty simple. When this system fails, you get flooding.
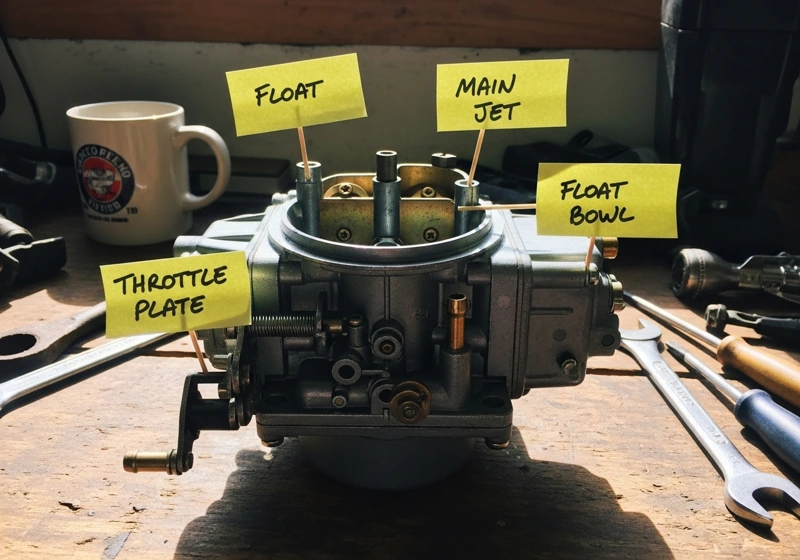
Main Jet: This is a tiny brass piece with a precisely drilled hole. It meters fuel to the engine. Clogged main jets cause about 90% of the carburetor problems I deal with. One speck of dirt in there and you’re done.
Idle Circuit: A separate set of passages and jets that feed the engine at idle. This is where varnish loves to build up.
Throttle Plate: Butterfly valve that opens and closes to control airflow and engine speed. It should close completely at idle and open all the way at full throttle.
Choke Plate: Another butterfly valve that restricts air when starting cold. Gives you a richer mixture for starting. Problems here make cold starting miserable.
Venturi: The narrow throat of the carburetor. Air speeds up through here, creating a vacuum that pulls fuel into the airstream. Basic physics, but it works great.
Gaskets and O-Rings: Seal everything up and prevent air leaks. Old gaskets cause all sorts of weird running problems that’ll drive you crazy trying to diagnose.
Buying Replacement Parts
When you’re buying small engine carburetor parts, use your engine model number, not your mower model. Two identical mowers might have completely different engines with different carburetors. I’ve seen people order the wrong parts because they didn’t check this.
OEM parts are guaranteed to fit and are of good quality, but they are more expensive. Aftermarket parts are cheaper, but it’s hit or miss on quality. For complete carburetors, I usually suggest OEM. For gaskets and rebuild kits, aftermarket’s are usually fine.
Rebuild Kits vs Individual Parts
A rebuild kit has gaskets, O-rings, a float needle, and sometimes jets. If your engine’s more than five years old and still has the original carburetor, a rebuild kit’s a smart move. Usually costs 10-25 bucks, and you get everything you need.
If you just need one specific part, like one bad gasket, buy that. No point buying a whole kit.
When to Just Buy a New Carburetor
If your carburetor’s really corroded, has stripped threads, cracks in the body, or would cost more to rebuild than replace, just buy a new one. Complete carburetors for most mowers run 20-60 bucks. Sometimes it’s just not worth the hassle.
Honda Small Engine Carburetor: Brand-Specific Tips & Solutions
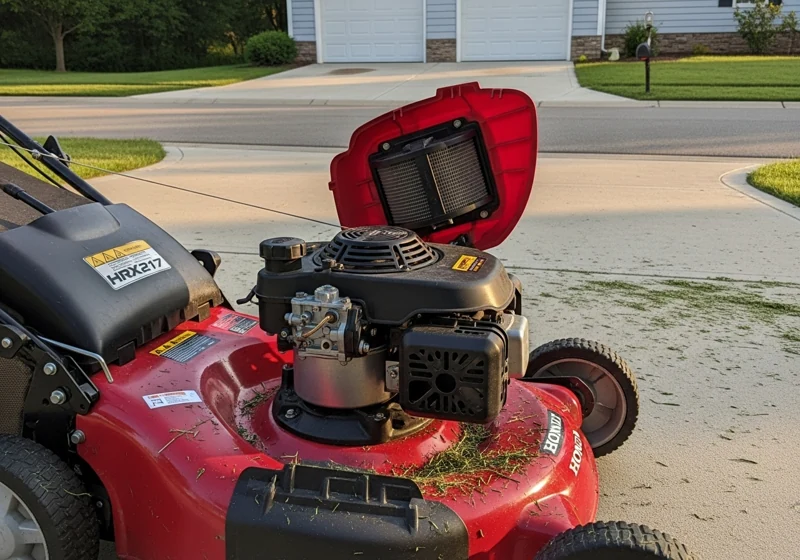
I work on a lot of Honda small engine carburetor systems. I’ve got a Honda HRX 217 carburetor on my own mower at home, so I know these pretty well. Let me share some Honda-specific stuff.
What Makes Honda Different
Honda builds quality stuff. Their carburetors last longer than most other brands. But they’re not magic – ethanol fuel and lack of maintenance will kill them just like anything else.
The Honda small engine carb often has an auto-choke system instead of a manual choke. There’s a little thermostat-controlled mechanism that handles the choke automatically. It’s convenient when it works, but when it fails, you’re going to have starting problems. If your Honda won’t start cold but runs fine once it’s warm, check the auto-choke.
Common Honda Problems
HRX217 Issues: The Honda HRX 217 carburetor is generally bulletproof, but that pilot jet (idle circuit) is tiny. Really tiny. It clogs easily. If your HRX217 won’t idle or dies when you let off the throttle, focus on cleaning that pilot jet really well.
GCV Series Engines: These engines use a carburetor with the float bowl mounted on the side instead of underneath. The float pin can work loose over time. When you reassemble it, make sure that the pin’s secured properly or you’ll have problems.
Cleaning Honda Carburetors
Honda carburetors respond really well to thorough cleaning. Use Honda carburetor cleaner if you can get it – they formulate it for their specific materials. The main jet usually unscrews with a flat-blade screwdriver.
Pay extra attention to that pilot jet and the emulsion tube. These are critical for smooth operation. A single wire strand from a twist-tie works perfectly for clearing those tiny passages.
Adjusting Honda Stuff
Most Honda lawn mower engines have factory-set carburetors with limited adjustment. Usually just idle speed. Don’t try drilling out EPA limiter caps on mixture screws. You’ll void your warranty and probably make things worse, not better.
OEM vs Aftermarket for Honda
I always recommend genuine Honda carburetors for their engines. Yeah, aftermarket versions might save you 20 or 30 bucks, but I’ve seen too many that don’t quite fit right or use cheap materials. Honda parts cost more, but they’re worth it.
Carburetor vs Fuel Injection: Understanding Small Engine Fuel Systems
People ask me all the time: Why are we still messing with carburetors when cars went to fuel injection 30 years ago? It’s a fair question.
Why Small Engines Still Use Carburetors
Cost: A small carburetor costs 20-60 bucks. Fuel injection needs electronic sensors, fuel pumps, injectors, and a computer. That’s easily 200-500 dollars added to manufacturing cost. For a 300-dollar lawn mower, that doesn’t make sense. Understanding different lawn mower engine types helps you maintain them properly.
They’re Tough: Small engines live in brutal conditions. Dust, vibration, heat, cold. Carburetors have no electronics to fail. They just work.
You Can Fix Them: Anyone can clean a small engine carb in their garage with basic tools. Fuel injection requires scan tools and specialized knowledge.
They Work Fine: Most small engines don’t need the precision that fuel injection provides. A properly tuned carburetor works perfectly fine for cutting grass.
The Future
Electronic fuel injection is coming to small engines, slowly. Some expensive zero-turns and premium walk-behinds have it now. Better fuel economy, easier starting, lower emissions.
But carburetors will dominate small engines for years yet. They’re proven technology that works when maintained properly.
Which Is Better for Homeowners?
For most people, carburetors are actually better. You can fix them yourself; parts are cheap, and it’s one less electronic system that can go wrong. Fuel injection makes sense for commercial guys who use equipment all day, every day, but for weekend warriors? Carburetors are fine.
When to Repair vs Replace Your Small Engine Carburetor
This is the real question everybody wants answered: Should you repair carburetor small engine problems or just replace the whole thing? Let me give you my honest opinion based on fixing thousands of these.
When to Repair
Your carburetor’s less than 10 years old and made by a decent manufacturer. Most problems at this age are just dirt and varnish. Cleaning fixes it.
The body and castings look good. No cracks, threads are okay, not corroded to hell. Physical damage usually means replacement.
You’ve got the time and patience. Cleaning a small engine carburetor properly takes a couple of hours. If you rush it, you’ll be doing it again.
Replacement parts are expensive or hard to find. Some older or oddball engines have pricey OEM carburetors. Repair makes sense then.
When to Replace
The carburetor is severely corroded. Ethanol fuel and moisture do a number on these things. Corrosion usually means internal damage you can’t see or fix.
There are cracks in the casting or warped surfaces. No amount of cleaning fixes structural damage.
Multiple parts are shot. If you need a float, needle, multiple gaskets, and jets, you’re getting close to new carburetor money anyway.
You’ve already cleaned it twice, and it still doesn’t work right. Sometimes a carburetor’s just worn out inside and won’t seal properly anymore.
A new one costs less than 40 bucks. Your time’s worth something. Sometimes a new part is the smart choice.
What It Actually Costs
A rebuild kit runs 10-25 dollars. Add your time, and you’re looking at a cheap fix if cleaning and fresh gaskets solve it.
New aftermarket carburetors usually cost 20-60 bucks, depending on the engine. OEM runs 40-150. For most homeowner stuff, aftermarket works fine.
Professional cleaning and repair cost 50-100 dollars in labor alone. If you’re paying someone, replacement often makes more sense.
What I’d Do
Try cleaning it first. You’ll learn something, and it costs almost nothing but time. If cleaning doesn’t work, replace it rather than throwing more money at repairs. I’ve watched people spend hours and 50 bucks in parts trying to save a 35-dollar carburetor. Don’t do that.
Preventing Future Problems
Here’s what I tell everybody: preventing carburetor problems beats fixing them every single time. Do these things:
Use fresh fuel with stabilizer, especially if your equipment sits for weeks between uses. Ethanol fuel goes bad in 30 days without a stabilizer. For complete seasonal maintenance tips, check out our year-round lawn care guide.
Run your engine dry before storing it for winter. Either add stabilizer and run it, or run the carburetor completely out of gas. Stale gas causes 90% of carburetor problems.
Change your air filter regularly. A dirty filter makes your engine run rich, which fouls the carburetor.
Buy decent fuel. That cheap gas might save you a nickel a gallon, but it’ll cost you hours of repair time.
Start your equipment once a month during the off-season. Even five minutes keeps fuel fresh and prevents gumming.
Final Thoughts
Look, messing with small engine carburetor problems can seem scary at first. I totally get it. But after fixing thousands of these things, I can tell you: you’re way more capable than you think. Most carburetor issues boil down to old gas and dirty parts. Both things you can handle yourself.
Start with the basics. Fresh fuel, clean air filter, don’t let equipment sit forever with gas in the tank. If problems show up, work through them systematically. Most issues get solved with thorough cleaning. You don’t need a mechanic’s license, just some patience and willingness to figure it out.
The money you save doing your own small engine carb repair adds up fast. Shops charge 75-150 bucks for work you can do in an hour or two with 15 dollars’ worth of parts. Over the life of your equipment, that’s real money. Learning basic DIY lawn mower repair skills pays off quickly.
And honestly? Fixing your own stuff feels pretty good. When you pull that starter cord and your mower fires right up after you’ve cleaned the carburetor yourself, you’ll feel pretty damn satisfied. I still do every time.
So grab your tools, take your time, and don’t be scared to get your hands dirty. Your mower will run better, and your wallet will be happier. Thousands of homeowners have done this successfully. You can too.
Hard starting, rough running, surging, no power, black smoke, or the engine dying when you release the choke. If you’ve checked the spark plug, air filter, and fuel line and they’re all good, it’s probably the carburetor. Quick test: spray some starting fluid while trying to start. If it fires briefly, your carburetor’s not delivering fuel.
You can try. Spray carb cleaner through the intake while it’s running, or take off the air filter and spray right into the carb throat. Might dislodge light varnish. Won’t clean seriously clogged jets though. For real problems, you’ve got to take it apart. In my experience, shortcuts mean doing the job twice.
Find the idle speed screw, usually on the carb body or throttle linkage. With the engine warm and running, turn the screw slowly. Clockwise usually speeds it up, counterclockwise slows it down. Adjust until it runs smoothly without dying or racing. Most mower engines idle around 1,750-2,200 RPM. Check your owner’s manual for the exact setting.
The float needle’s not sealing. It could be a stuck float, a dirty or damaged needle valve, a wrong float height, or debris keeping the needle from closing. You’ll see gas leaking from the carb or air filter, and the engine might not start because it’s over-fueled.
DIY with a rebuild kit: 10-25 bucks plus your time. Professional cleaning and repair: 50-100 in labor plus parts. New aftermark
