
Pre Season Mower Tune Up: The Complete Spring Checklist
A pre-season mower tune-up is the process of refreshing your mower’s oil, spark plug, air filter, fuel, and blades before the first cut of the season. Completing these tasks takes roughly one to two hours and prevents the mid-season breakdowns, hard starts, and uneven cuts that follow a winter of neglect. Do it once each spring and your mower will run reliably from the first mow through the last.
Quick Reference: Pre-Season Tune-Up at a Glance
- Oil: Drain old oil, refill with the manufacturer-specified grade (commonly SAE 30 or 10W-30)
- Spark plug: Inspect, gap, and replace if worn or fouled
- Air filter: Tap clean or replace; paper filters cannot be washed
- Fuel: Drain old gas or add fresh fuel; check and replace the fuel filter
- Blade: Sharpen or replace; balance before reinstalling
- Belts and cables: Inspect for cracking, glazing, and fraying
- Deck: Scrape and clean the underside before the first mow
This guide walks through each step of a complete pre-season mower tune-up in the order our research team recommends tackling them, from the engine out to the deck. We cover both walk-behind and riding mowers throughout, with notes on where the process differs. For anything related to seasonal storage prep, our guide on lawn mower winterizing covers the fall side of the same cycle.
Safety First: What to Do Before You Touch Any Part of the Mower
Every maintenance step in this article assumes the mower is safe to work on. Take these precautions before you begin, and before you remove any component.
- Disconnect the spark plug wire. On gas mowers, pull the rubber boot off the spark plug and tuck it away from the plug. This is the single most important step: it prevents the engine from firing if the blade or crankshaft moves accidentally while you are working underneath the mower.
- Remove the battery on electric and battery-powered mowers before opening any access panel or touching the blade.
- Let the engine cool completely before draining oil, removing the spark plug, or touching the exhaust area. Hot metal burns fast.
- Work on a flat, stable surface with the parking brake engaged on riding mowers. Block the wheels if you plan to tip the mower or remove the deck.
- Wear gloves and eye protection when handling the blade, draining oil, or working with any fuel component.
Stop immediately and call a qualified technician if you notice any of the following during your inspection:
- Fuel leaking from the carburetor, fuel line, or tank
- Visible cracks in the engine block or deck housing
- A bent crankshaft (indicated by blade wobble that persists after balancing)
- A blade bolt that is seized, stripped, or has damaged threads
- Frayed or exposed electrical wiring on electric or battery mowers
- A deck that shows deep rust penetration or structural failure
These situations go beyond routine maintenance and require professional diagnosis.
Quick action:
- Pull the spark plug wire before doing anything else, every time
- Let the engine cool for at least 30 minutes before draining oil or removing the plug
- Keep a rag and an approved fuel container nearby before you start
Step 1: Change the Oil

Old oil left in an engine over winter thickens, picks up moisture, and loses its protective additives. Starting a new season on dirty oil puts immediate wear on the engine. This is usually the first task in any tune-up, and it takes about 10 minutes.
What oil to use
Check your owner’s manual first. Most residential walk-behind and riding mower engines use one of the following grades, depending on operating temperature:
| Oil Grade | Best For | Notes |
|---|---|---|
| SAE 30 | Warm weather mowing (above 40°F) | Traditional choice for small engines; common in older mowers |
| SAE 10W-30 | Wider temperature range; spring starts in cooler climates | May increase oil consumption slightly in older engines |
| Synthetic SAE 5W-30 | All temperatures; best cold-start protection | Costs more, but acceptable at all temperatures per most manufacturers |
| Vanguard 15W-50 | Commercial or extended-use engines | Not needed for residential mowers |
According to Briggs and Stratton’s official fuel and oil guidance, SAE 30 is the most common oil for small engines in warm conditions, while SAE 10W-30 improves cold-weather starting across a wider temperature range. Use a high-quality detergent oil rated “For Service SF, SG, SH, SJ or higher.” Synthetic oils are acceptable at all temperatures and do not change the required oil change interval.
How to change the oil
- With the spark plug wire disconnected, locate the oil drain plug on the underside of the engine or the oil fill tube (some walk-behind mowers drain by tipping).
- Place an approved drain pan under the drain point. Remove the drain plug and let the old oil drain completely.
- Replace the drain plug, then add fresh oil to the manufacturer-specified level. Check the dipstick (the oil measurement rod that threads into or rests in the oil fill tube) after adding oil to confirm you’re at the correct fill level. Do not overfill.
- On riding mowers with an oil filter, replace the filter at the same time as the oil.
Most push mower engines hold around 15 to 20 ounces of oil. Riding mowers vary widely: consult your manual. Overfilling a small engine can push oil into the air filter or exhaust, causing white smoke and hard starting.
Quick action:
- Check your manual for the exact oil grade and capacity before buying anything
- Dispose of old oil at an auto parts store or municipal recycling center; never pour it down a drain
- Replace the oil filter on riding mowers at every oil change
Step 2: Replace the Spark Plug
The spark plug (the small threaded component that screws into the engine cylinder head and fires a spark to ignite the fuel-air mixture) is one of the most cost-effective parts to replace every spring. A worn or fouled plug causes hard starting, rough running, and increased fuel use.
Inspect before you replace
Remove the old plug using a spark plug socket (a deep socket with a rubber insert to protect the ceramic insulator). Look at the firing tip:
- Light tan or gray tip: The plug was working correctly. If it has less than one season on it, you can reinstall it after checking the gap.
- Black, sooty, or oily deposits: The engine was running rich, or oil was entering the combustion chamber. Replace the plug and investigate the underlying cause.
- White or chalky tip: Indicates overheating. Replace the plug and verify the correct heat range for your engine.
- Cracked insulator or worn electrodes: Replace without question.
As NGK explains in their spark plug reading guide, dark or wet deposits at the firing end often point to an overly rich condition, oil control issues, or a plug gap that is too large. Reading the old plug before discarding it can tell you a great deal about engine health going into the season.
Setting the gap
The gap is the space between the center electrode and the ground electrode at the tip of the plug. It must match your engine’s specification. According to NGK, even a factory pre-gapped plug may not be set to the right gap for your specific engine. An incorrect gap leads to misfires, power loss, and poor fuel economy. Find the correct gap in your owner’s manual (commonly 0.030 inches for many residential small engines, but always verify). Use a round wire gap tool, not a flat feeler gauge, for accurate measurement on a new plug.
Installing the new plug
Thread the new plug in by hand first to avoid cross-threading. Then tighten with the socket. NGK’s installation guidance recommends tightening a new plug with a gasket seat about half to two-thirds of a turn past finger-tight. Under-torquing causes heat dissipation problems; over-torquing can crack the insulator or stretch the shell and damage the cylinder head threads. If you have a torque wrench, follow the manufacturer’s specified torque value from your manual.
Quick action:
- Buy the replacement plug specified in your manual by part number, not just any plug that fits
- Always check the gap with a wire gap tool before installing, even on “pre-gapped” plugs
- Thread the plug in by hand first to protect the cylinder head threads
Step 3: Clean or Replace the Air Filter
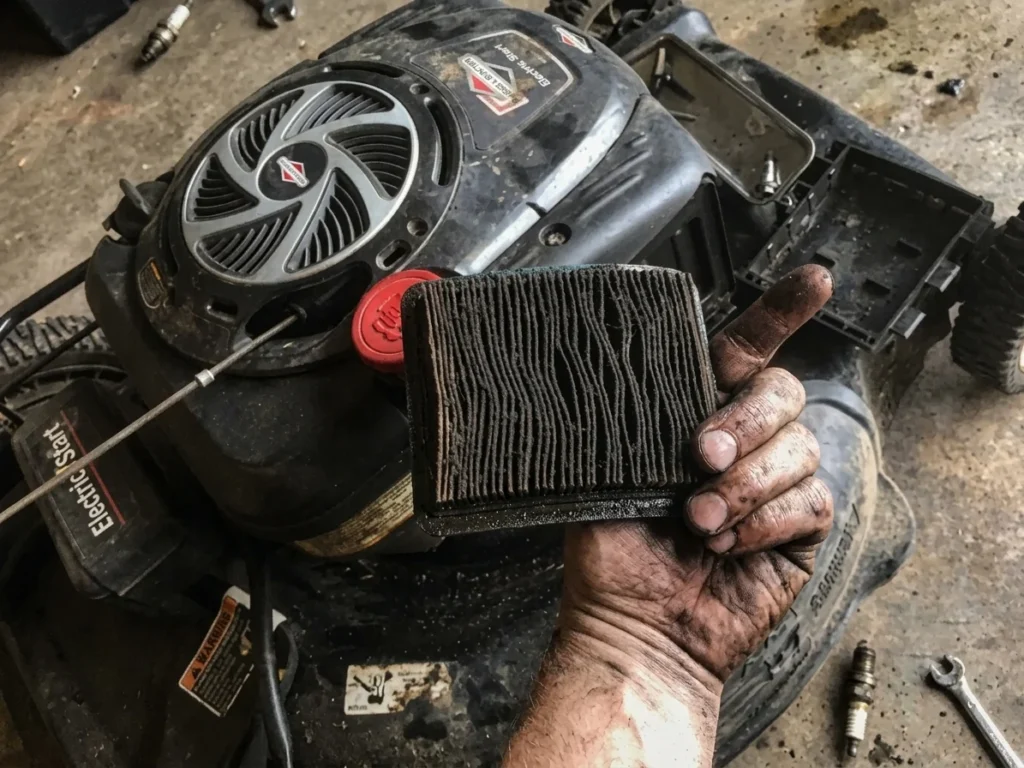
The air filter keeps dust, grass particles, and debris out of the engine’s air intake. A clogged filter chokes the engine: it restricts airflow, forces the engine to burn a richer fuel mixture than intended, reduces power, and increases fuel consumption. This is a quick job, but it is one that most homeowners overlook.
Most residential mowers use one of two filter types:
- Paper (pleated) filters: These cannot be washed. Tap the filter gently to dislodge loose dust. RepairClinic notes that the simple light test works well: hold the filter up to a light source. If you can see light through the paper, it is usable; if the paper blocks the light, replace it. Paper filters typically cost under $10 and should be replaced at least once per season.
- Foam filters: These can be washed with warm water and mild dish soap. Allow the filter to dry completely before reinstalling. If a foam filter is torn, compressed, or saturated with oil, replace it.
Some mowers have a dual-stage filter: a foam pre-cleaner that wraps a paper element. Service both components at the same time.
Quick action:
- Do not oil a paper filter; oiling is only for foam-type filters when the manufacturer specifies it
- A foam filter must be completely dry before reinstalling; a wet filter will restrict airflow nearly as badly as a dirty one.
- Never run the mower without the air filter in place, even briefly
Step 4: Address the Fuel System
If you mowed last fall without draining the tank or treating the fuel, there is a real chance that last season’s gasoline has started to degrade. Briggs and Stratton states that gasoline begins to degrade in as little as 30 days, which can cause fuel system clogging and prevent the engine from starting the following season. Ethanol-blended fuels attract moisture, which accelerates this process.
Old fuel: drain or run out
If the mower sat with untreated fuel all winter, the safest approach is to drain the tank into an approved container and add fresh gasoline. Use fuel with a minimum octane rating of 87. Avoid E15 or E85 fuels: Briggs and Stratton’s documentation warns that E15 attracts moisture, which separates into a water-alcohol layer at the bottom of the tank, potentially causing significant engine damage and voiding the warranty.
Fuel filter check
Most walk-behind mowers have a small inline fuel filter (a transparent or semi-transparent cartridge in the fuel line between the tank and carburetor). Hold it up to the light. If it appears dark, contains visible sediment, or has been on the mower for more than one to two seasons, replace it. A clogged fuel filter starves the engine of fuel under load, causing the engine to surge or stall.
Carburetor check
If you are getting fresh fuel to the mower and it still starts hard, runs rough, or surges at idle, a dirty carburetor is the likely cause. Gumming and varnish deposits from degraded fuel build up in the carburetor’s small jets and passages. Light deposits can sometimes be addressed with a fuel system cleaner added to a fresh tank of gas. If the symptoms persist, the carburetor will need to be cleaned or rebuilt by a qualified small-engine technician. Our article on lawn mower engine surging covers the diagnosis steps in more detail.
Quick action:
- If the mower sat all winter with untreated fuel, drain it and start fresh
- Replace the inline fuel filter if it looks dark or has not been replaced in two or more seasons
- Use fresh 87-octane gasoline; avoid E15 or flex fuel in small engines
Step 5: Sharpen or Replace the Blade

A dull blade does not cut grass: it tears it. Torn grass tips turn brown, lose water, and become more susceptible to fungal disease. This is one of the highest-impact maintenance steps in the entire tune-up, and it takes 15 to 20 minutes.
Inspect the blade before sharpening.
With the spark plug wire disconnected and the mower on its side (carburetor facing up to prevent oil from entering the air filter), examine the blade carefully:
- Minor dullness or small nicks: Sharpen the blade.
- Cracks, severe bends, deep gouges, or more than one-third of blade material worn away: Replace the blade. Do not sharpen a cracked or bent blade; a blade spinning at high RPM can fail catastrophically if it is structurally compromised.
How to sharpen
The target sharpening angle matches the factory bevel already on the blade, typically 30 to 45 degrees depending on the manufacturer. The goal is a “butter knife” edge, not a razor edge: a razor edge chips faster and dulls sooner. Use a metal file, a drill-mounted blade sharpener, or an angle grinder. File in one direction only; do not drag the file back across the edge. Apply equal strokes to both cutting edges so the blade stays balanced.
Balance the blade before reinstalling.
After sharpening, check blade balance with a blade balancer (a simple cone-shaped tool, often under $5 at any hardware store). Place the blade on the balancer through the center hole. If one end drops, that end is heavier: file a small amount of material from the heavy side and recheck. An unbalanced blade causes vibration that wears out spindle bearings and deck components far faster than a dull blade ever would.
Reinstall with correct torque
Reinstall the blade with the cutting edges and lift fins facing up into the deck (not down toward the ground). Tighten the blade bolt to your manufacturer’s specified torque. Walk-behind mowers typically require 35 to 50 ft-lbs; riding mowers commonly need 70 to 90 ft-lbs. Always consult your manual for the exact value. Under-torquing allows the blade to shift during use, which is a serious safety hazard.
Quick action:
- Disconnect the spark plug wire before tipping the mower or touching the blade, every single time
- Replace any blade that is cracked, bent, or severely gouged; sharpening cannot fix structural damage
- Balance the blade after every sharpening session; skipping this step causes vibration and premature bearing wear
Step 6: Inspect Belts and Control Cables
Belts and cables are easy to overlook during a tune-up because they appear fine until they fail. Inspecting them in spring takes only a few minutes and can prevent a mid-season breakdown at the worst possible moment.
Belt inspection checklist
Most riding mowers and self-propelled walk-behinds have at least one drive belt. Riding mowers typically have two: a deck belt (which spins the blades) and a drive belt (which powers the wheels). Visually inspect each belt for the following warning signs:
| What You See | What It Means | Action |
|---|---|---|
| Small surface cracks | Rubber aging and drying | Monitor; replace soon |
| Glazed (shiny) sidewall | Belt slipping on pulleys; heat buildup | Replace before the season |
| Frayed edges | Belt is nearing the end of its service life | Replace before the season |
| Cuts, nicks, or chunks missing | Impact damage or debris in the deck | Replace immediately |
| Visible stretching or excessive slack | Belt no longer maintaining tension | Replace; tension adjustment will not fix a stretched belt |
A belt that looks marginal in spring will almost certainly fail during peak mowing season. Belts are relatively inexpensive; replacing a suspect belt proactively costs far less than the spindle bearings, pulleys, and labor that a snapped belt can damage on the way out.
Control cable check
Check the bail lever cable (the safety cable that stops the blade or engine when you release the handle on a walk-behind), the throttle cable, and, on riding mowers, the blade engagement cable. These cables should move freely without binding. Frayed inner wire strands or a kinked housing are grounds for replacement before the season. A bail lever cable that does not stop the blade when released is a safety failure, not a minor inconvenience.
Quick action:
- Inspect all belts visually before the first mow of the season; five minutes here can prevent a season-ending breakdown
- Replace any belt showing glazing, fraying, or chunks; do not wait for it to snap
- Test the bail lever before mowing: release it and confirm the blade stops within the time specified in your manual
Step 7: Clean the Mower Deck
Caked-on grass clippings under the mower deck do more than look bad. Thick buildup restricts airflow under the deck, which reduces cutting efficiency and creates the conditions for accelerated rust. Old organic material can also harbor mold and fungal spores that your mower will spread across the lawn on the first mow of the season.
With the spark plug wire disconnected, tip the mower on its side (carburetor facing up) or use a deck lift to access the underside. Use a putty knife or stiff plastic scraper to break up compacted clippings. Follow up with a stiff brush and a rinse with water. Allow the deck to dry before storing or mowing. A light coat of silicone spray or deck protector on the clean underside reduces how much the next season’s clippings stick to the metal.
Quick action:
- Always tip walk-behind mowers with the carburetor and air filter facing up to prevent oil contamination
- Check for rust spots while the deck is clean; wire-brush small rust areas and apply a rust-inhibiting paint before the season starts.
- Clean the deck after every few mows during the season to prevent the buildup that makes spring cleaning difficult.
Pre-Season Tune-Up Checklist: Print and Keep
This checklist summarizes every step in order. Check each item off before the first mow of the season.
Pre-Season Mower Tune-Up Checklist
- ☐ Disconnect spark plug wire before starting any work
- ☐ Let engine cool completely (minimum 30 minutes)
- ☐ Change engine oil (use manufacturer-specified grade)
- ☐ Replace oil filter (riding mowers)
- ☐ Inspect and replace spark plug; verify gap with wire tool
- ☐ Clean or replace air filter
- ☐ Drain old fuel or add fresh 87-octane gasoline
- ☐ Replace inline fuel filter if dark or over two seasons old
- ☐ Inspect blade; sharpen or replace as needed
- ☐ Balance blade before reinstalling
- ☐ Reinstall blade to manufacturer torque specification
- ☐ Inspect drive and deck belts for glazing, cracking, fraying
- ☐ Test bail lever cable and blade engagement cable
- ☐ Scrape and clean the underside of the deck
- ☐ Reconnect spark plug wire
- ☐ Start the mower and confirm smooth, stable operation before mowing
When to Call a Technician Instead of DIY
Most of the steps above fall well within what a careful homeowner with basic tools can accomplish in an afternoon. But there are situations where the right call is to bring the mower to a certified small-engine technician rather than push through.
- The engine starts but surges, stalls, or runs rough after a fresh plug, air filter, and clean fuel. This typically points to a carburetor issue that requires disassembly and professional cleaning.
- The blade bolt is seized or has stripped threads.
- There is a fuel leak from the carburetor, fuel line, or tank.
- The mower vibrates severely even after the blade has been sharpened and balanced. This may indicate a bent crankshaft, which requires professional assessment.
- A riding mower’s transmission does not engage smoothly after belt replacement.
- Any electrical issue on a battery-powered mower beyond a simple battery swap.
For a deeper dive into what can go wrong at the start of a season and how to work through each symptom, our guide to small engine won’t start troubleshooting covers the full diagnostic sequence. And if you plan the whole year in terms of mowing and seasonal lawn care tasks, our seasonal lawn care year-round guide puts the pre-season tune-up in context alongside summer and fall lawn care practices.
FAQ’s
How long does a pre-season mower tune-up take?
For a walk-behind mower, plan for one to two hours if you are doing all steps: oil change, spark plug, air filter, fuel check, blade sharpening, belt inspection, and deck cleaning. A riding mower with more components typically takes two to three hours the first time through. The process becomes faster in subsequent seasons once you know the layout of your machine.
Do I need to do a tune-up if I stored the mower properly last fall?
Yes, though the scope may be smaller. Even a properly stored mower benefits from a spring oil change, a spark plug inspection, and a blade check before the first mow. Fuel treated with a stabilizer over winter should still be topped up with fresh gas in spring. If you completed a thorough winterizing process, you may be able to skip draining and replacing old fuel, but all other steps remain worthwhile.
Can I use the same spark plug for more than one season?
You can, if the plug passes inspection: light-tan tip, no cracks, no heavy deposits, and a gap still within specification. In practice, spark plugs for residential small engines cost between $3 and $8, and replacing one annually is a reliable way to ensure clean ignition. If there is any doubt, replacement is the more cost-effective choice compared to the time wasted on a hard-starting engine mid-season.
What happens if I skip the air filter?
A clogged air filter forces the engine to pull air through restricted passages, resulting in a fuel-rich mixture. This leads to reduced power, increased fuel consumption, carbon buildup on the spark plug, and accelerated engine wear over time. In severe cases, an extremely clogged filter can cause the engine to overheat or fail to start at all.
Should I sharpen the blade myself or take it to a shop?
If you have a bench vise, a metal file or angle grinder, and a blade balancer, sharpening the blade yourself is a straightforward DIY task. If you have never done it before, starting with a hand file gives you the most control and the lowest risk of overheating or over-grinding the blade. If the blade has significant damage, is cracked, or you are not comfortable with the process, a small-engine shop or hardware store sharpening service is a low-cost alternative: typically under $15 per blade.
Key Takeaways
- Always disconnect the spark plug wire before any maintenance task involving the blade, underside of the mower, or fuel system.
- A complete pre-season tune-up covers oil, spark plug, air filter, fuel, blade, belts, cables, and deck cleaning; skipping any one of these can shorten mower life or cause a mid-season failure.
- Blade sharpening is the single highest-impact maintenance step for lawn health: a dull blade tears grass and opens it to disease.
- Old or untreated fuel left over from winter is one of the most common causes of spring starting problems; drain it or add fresh gas before the first mow.
- Inspect belts visually in spring: glazing, fraying, or cracking are signs to replace before the season, not after a breakdown.
This article is for general informational and educational purposes only. It has been compiled from manufacturer guidelines, industry standards, and published horticultural and mechanical research. Always follow the safety instructions in your specific equipment’s owner’s manual. For chemical applications, follow product label directions and consult your local cooperative extension service for region-specific guidance. For safety-related repairs, follow your equipment manual and consult a qualified technician.
